Fluent Meshing传统操作流程演示
本案例演示Fluent Meshing的传统操作流程(outline View)的基本操作方式。
案例导入其他网格软件生成的面网格,在Fluent Meshing中对导入的面网格进行检查及重构,并生成体网格。
1、导入网格
-
启动Fluent Launcher。如下图所示,选择列表项Meshing ,可以指定Meshing Processes及Working Directory

注:Fluent Meshing允许以并行的方式生成计算网格。
-
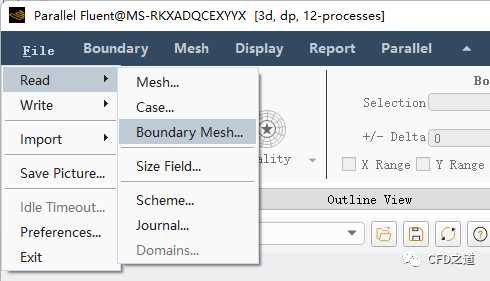
选择菜单File → Read → Boundary Mesh…,读取面网格文件WS01_Pipes.msh。文件下载链接见文末。

注:这里也可以使用Read → Mesh…导入网格。Mesh既可以导入面网格,也可以导入体网格。Boundary Mesh只能导入面网格。
-
右键选择模型树节点Unreferenced,选择菜单项Draw显示导入的网格

选择Ribbon中Display选项下的Face Edges,可查看图形窗口中的网格。

网格如下图所示。

若在图形窗口中看不到网格,可以点击图形窗口的工具条按钮Fit to Window最大化图形显示。

2、创建面网格
-
右键选择模型树节点Unreferenced > Boundary Face Zones,选择菜单项**Create New Objects…**弹出设置对话框

-
弹出的对话框中选择全部Face Zone,指定Object Name为pipes,选择Object Type为mesh,激活选项 Create a label for each face zone ,点击Create按钮创建网格

注:选项Create a label for each face zone能够为已命名的边界重新创建标签,强烈建议在创建网格时将其选中。较高版本的Fluent Meshing中才有此选项。
3、网格清理
-
右键选择模型树节点Mesh Objects,选择菜单项Draw All显示网格

-
右键选择模型树节点Mesh Objects > pipes,点击弹出菜单项Summary 查看面网格信息

在TUI窗口中显示如下图所示信息。

可以看到导入的网格中存在一些自由面(free-faces),在生成体网格之前可以将其清除掉。
注:在进行体网格生成之前,有必要检查并修复面网格,良好的面网格是生成高质量体网格的必要条件。

-
右键选择模型树节点pipes,选择菜单项Diagnostics → Connectivity and Quality…弹出网格修复对话框

-
如下图所示,选择Face Connectivity标签页下选择Free,点击 Mark 按钮,并点击 First 按钮若干次,直至 Unvisited 后的数量为 0 ,选择选项 Merge Nodes ,点击按钮 Apply for All

-
处理完毕后点击对话框按钮Summary 查看网格信息

-
点击Ribbon工具栏中Bounds下的Reset按钮

-
右键选择模型树节点Mesh Objects,选择菜单项Draw All在图形窗口中重新显示网格 此时面网格处理完毕,可以选择菜单 File → Wriete → Mesh 保存面网格。
-
右键选择模型树节点pipes,选择弹出菜单项Auto Mesh…,弹出网格生成对话框

-
如下图所示,采用如下图所示设置,点击Mesh按钮生成多面体网格 
在这里可以设置边界层网格参数,关于边界层设置,在后续的案例中再描述。
5 、查看网格
-
右键选择模型树节点Volumetric Regions,点击菜单项Draw All 可以查看生成的网格

生成的多面体网格如图所示。

可以利用Clipping Planes查看截面上的网格。
-
激活选项Insert Clipping Plane及 Draw Cell Layer ,可以通过选择 Limit in X、Limit in Y 或 Limit in Z 选择查看X,Y,Z截面上的网格

如下图所示为显示z切面上的体网格。

除了可以使用切平面显示体网格外,还可以利用Bounds进行自定义切面显示。
-
键盘输入快捷键Ctrl+N切换至节点选择模式,利用鼠标右键在图形窗口中选择如下图所示的节点

-
Ribbon工具栏中点击按钮Set Ranges,取消选择 X Range 及 Y Range

-
右键选择节点 Pipe ,并选择菜单项 Draw 显示网格

此时图形窗口网格显示如图所示。

-
选择菜单Display → Grid,弹出显示对话框

-
如下图所示,切换至Cells标签页,激活选项 Bounded ,选择 Cell Zones 列表项,点击 Display 按钮显示网格

剖面网格如下图所示。

-
右键选择模型树节点Cell Zones,选择菜单项 Summary 查看网格信息

TUI窗口显示的网格信息如下图所示。

可以看到网格数量、网格质量以及质量评价指标等信息,如图所示,网格数量为91825,最小质量为0.22301118,采用的网格质量度量指标为正交质量。
-
点击按钮Quality → Diagnostics Tools…打开网格质量检查对话框

在Diagnostics Tools对话框中可以对网格质量进行全面的检查

-
利用菜单File → Write → Mesh… 可保存体网格

6 、准备计算网格
生成的体网格可以直接传递到Solution模式下进行求解。
-
右键选择模型树节点Model,选择菜单项 Prepare for Solve 可以对网格进行检查,并清理掉一些网格中重复的自由节点

-
点击R ib bon按钮Switch to Solution切换到Fluent Solution模式

-
在Fluent中检查计算区域与边界信息,如下图所示

区域与边界信息都齐全,可以进行下一步的设置计算。
较新版本的Fluent Meshing提供的Watertight Geometry工作流及Fault-Tolerant Meshing工作流能够满足绝大多数工程需要,不过传统工作流程在进行几何面修复、清理,以及网格编辑与网格质量控制方面依然是不可或缺的。传统工作流程在文档中被称为Advanced Meshing Topic,想要更精细的控制网格,有必要掌握传统工作流程的一些基本操作。
免责声明:
1、本站所有资源文章出自互联网收集整理,本站不参与制作,如果侵犯了您的合法权益,请联系本站我们会及时删除。
2、本站发布资源来源于互联网,可能存在水印或者引流等信息,请用户擦亮眼睛自行鉴别,做一个有主见和判断力的用户。
3、本站资源仅供研究、学习交流之用,若使用商业用途,请购买正版授权,否则产生的一切后果将由下载用户自行承担。
4、侵权违法和不良信息举报 举报邮箱:cnddit@qq.com


还没有评论,来说两句吧...